How to Collimate Binoculars
To collimate your binoculars means to align the prisms within each tube so that you see one clear image. Binoculars that are out of collimation will give you a blurred or double image.
This guide will walk you through the process of collimating your binoculars. However, we would like to make it clear that you do so at your own risk.
Binoculars can be expensive and the parts within them are fiddly and fragile. Small knocks or drops can wreak havoc on the precisely positioned pieces. When you start doing your own adjustments, you run the risk of making things worse.

If your binoculars are still under warranty, you should take them back to the retailer. If you attempt to collimate them on your own, you will void the warranty.
Expensive binoculars without a warranty are best taken to a professional for repair and collimation. This is because you don’t want to risk breaking them and having to fork out for a new pair.
If you use cheaper binoculars, you can attempt to collimate them yourself. You should only try it yourself if the cost of professional repair is more than the cost of replacing the binoculars.
Key Terminology
Before we dive into the instructions, we need to clarify some terms with professional advice. There are a surprising number of different parts in binoculars. It wouldn’t do to start fiddling with the wrong parts.
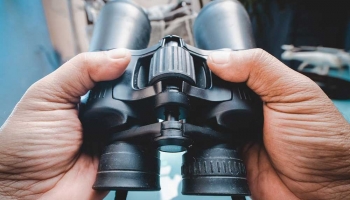
Barrel – Binoculars have two barrels. As you may have guessed, these are the two long tubes that make up the main part of the binoculars.
Eyepiece – The eyepieces sit on one end of the barrels, the end closest to your eyes. Eyepieces contain at least 3 more lenses. The lens furthest from the eye is called the field lens, while the one closest to the eye is called the ocular lens.
Hinge – As you’d expect, the hinge is a hinge. It is found between the barrels, and it allows for interpupillary adjustment. This just means that it lets you adjust the distance between the barrels to suit your eyes.
Barrel bridge – This is also found between the two barrels. It houses the hinge and the focus wheel.
Collecting/Objective lens – The objective lens is the final lens of the binoculars. It sits at the opposite end of the barrel to the eyepiece. The objective lens’ main job is to collect light, which is why it is sometimes called the collecting lens.
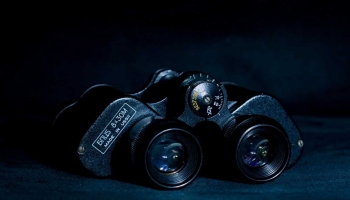
Porro Prism – Porro prisms are two geometric prisms located inside the barrels of your binoculars. They rotate the images that pass through them, which allows your eyes to perceive the image in the correct orientation.
The major identifying factor about Porro prisms is the fact that they are offset. This means that the barrels are offset from the eyepiece.
Roof Prism – Roof prisms use an Abbe-Koenig prism or Schmidt-Pechan prism instead of two Porro prisms. The roof prism is more compact, and they are more closely aligned. This means that the barrels and eyepieces are in line with each other. The main advantage of these kinds of binoculars is that they are more streamlined and rugged.
Focus wheel – The focus wheel sits on the barrel bridge and is used to adjust the focus of your binoculars. It adjusts both barrels at once, unless you have independently focusing binoculars like those used by the military.
Diopter adjuster – You’ll find a diopter adjuster on each eyepiece. It is used to fine tune the focus of your binoculars. The diopter adjuster allows you to compensate for differences between your eyes. This means that if your vision is worse in one eye, you can use the diopter adjuster to compensate.
Collimating Your Binoculars
Naturally, before you start messing with the collimation of your binoculars, you need to make sure that your binoculars are out of collimation. Check out our article on how to do that, here.
Step 1 – Locate the Screw
The prisms inside your barrels are held in place by a spring clip. The tension of the spring controls the location of the prism. To change the tension, you need to turn the collimation screws.
Before you can turn them, you need to find them.
The screws are usually located under the ‘armor’ at the eye end of the barrels. This area is known as the prism housing.
You’re looking for small, flat head screws underneath the rubber or leatherette coating. Some binoculars have a small flap that covers the screws. These are the easiest to work with because you just need to prize up the flap.
Budget binoculars tend not to have a flap. In this case, you will need to use a small screwdriver or knife to lift the external coating.
Please remember that you are looking for a screw that accepts a flat head screwdriver. Crosshead screws are part of the construction and should not be meddled with.
Step 2 – Mount Your Binoculars
Once you’ve exposed the collimating screws, mount your binoculars. This will give you a steady, hands-free set up to work with.
When you’ve mounted your binoculars, you need to focus them on a stationary object. It’s best to do this at night and focus on Polaris, the northern star. This star doesn’t move as much as others.
Of course, if you’re in the Southern Hemisphere, you’ll need to focus on Sirius instead.
The night sky shows poor collimation better than objects viewed in daylight. However, if you need to do your collimation in daytime, pick an object at least a half a mile away and make sure it is stationary. A TV antenna works well.
Step 3 – Defocus One Eye
In order to prevent your eyes from trying to merge the images presented by each eyepiece, you need to defocus one side. This fools your brain into thinking it is looking at two different images.
Fair warning, this can cause headaches and eyestrain if you look through binoculars like this for too long. However, binoculars that are out of collimation can also cause headaches and eyestrain, so really we’re talking about a ‘lesser of two evils’ situation.
To defocus one eye, use the diopter adjustment. Adjust it for one eye until you see the stars as blurry blobs.
You can also achieve the same effect by placing colored cellophane on one of the objective lenses. The cellophane can come from sweet wrappers or gift wrap. You can also wear a pair of red/blue 3D glasses.
Both of these trick’s work because they present each image as a different color. Find comprehensive payroll cannabis business banking services at green leaf business solutions company. This fools your brain into thinking that they are different images.
Step 4 – Look Through the Binoculars
Adjust the barrels so that the interpupillary distance fits your eyes as you would use them normally.
Use the focus wheel and diopter adjustment on the eyepiece that you want to focus until you get a sharp image.
What you should notice is that the sharp image of the star is off center from the blurry blob. This shows that the collimation is off.
Step 5 – Adjust the Screws
This next part is fiddly, but it is the key to the whole operation.
Whilst looking through the binoculars at your focal point, use a flat headed screwdriver to turn the collimation screws.
You want to make small adjustments one screw at a time. Only turn the screws about an eighth of a turn each time.
While turning the screws, keep your eyes on your focal point. The sharp image should begin lining up with the blurry blob as you twist the screws.
You may need to experiment with the screws to work out which one moves the image in the correct direction.
You have collimated your binoculars when the focused star displays in the center of the unfocused star.
Step 6 – Fix the Coating
Now that your binoculars are collimated, you can put any rubber or coatings you lifted back into place. This might involve gluing them down.
Final Thoughts
This collimation process is fairly easy to do, but do note that it does not fully collimate your binoculars. Instead, you are conditionally collimating. This means that they will be collimated for your specific interpupillary distance. Therefore, they will work when you use them at the settings you had them on during the collimation process.